Showing posts with label Cute. Show all posts

Wednesday, 23 September 2020

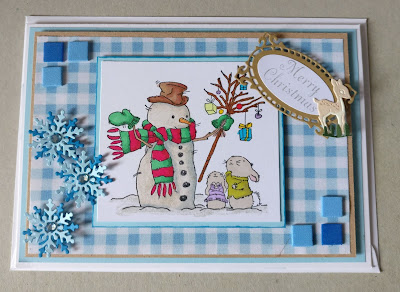
Christmas card

 Hello again lovely peeps,

We are celebrating with Christmas cards over at Fab'n'Funky challenges this week. 

I don't like being the bearer of bad news but Christmas is fast approaching, there are only 90 days until the big day 😲 Scary!!


A sweet little stamp from LOTV. I've gone for a Blue colour theme. 

The squares in the corners are foam mosaic tiles I found in a little tub in my loft, I have absolutely no idea where I got them but I reckon they have been up there for at least 10yrs (so ashamed).


Back soon with more sharing
Hugs & Happy Thoughts
Buffy xx

Sunday, 19 July 2020

Trip down memory lane

I was having a peek through some of my old post.
It's hard to believe I've been blogging for at over 10 years, since 2007 to be exact.

Anyway I've picked out a couple of favourites to share again

A Day at Doncaster - 2011 - hubby didn't enjoy the day and I just can't imagine why 😂 lack of trains I reckon


Happy Anniversary - Less is More - 2011 - got to love a One-Layer card


No Mistletoe Just Wine - 2016 - the saddest thing about this is my sis-in-law never got this card because I put it in a safe place.......................🤦


Kraft Away - 2016 - Ah my adventure into quilting.....


Fab'n'Funky Time Again - 2016 - Looking through all these posts, we seem to spend a lot of time at Donington Park Racetrack


Card Tutorial PLUS Hire a stall?? Oh Help  -  ah Christmas cards for the masses or should that be for my children to give out😂


Holy Crochet Batman - 2012  -  I can't believe how excited I got when this happened, especially since I can now whip up anything I set my heart on making. 
But you know what they say "You can never beat your first time 😉


Well that's it for this trip down memory lane, I hope you found something to inspire you.
I have met some amazing people an made some great friends, Thank You xx

Hugs & Happy Thoughts
Buffy xx


Thursday, 16 July 2020

Ice-cream key-chain Crochet

Hello again,

I promised you I would put the Ice-cream key-chain pattern on my blog so...........as promised....
(disclaimer - I'm not great at writing patterns up, so if anyone finds a problem I would welcome the feedback)

We are talking about these little guys 
Ignoring the centre Ice-cream (he's my little desk friend), the Key-chain ones are approx 3" in height

You will need :- 
2.5mm crochet hook
DMC Petra No.3 crochet thread
Key-chain accessories
6mm Safety Eyes
(you can of course use whatever thread and hook you have available but the size will vary)

Pattern :

Ice-cream Scoop 
  •     Magic ring, 6sc  into ring, leave longish tail for sewing on key-chain later. 
  • R1 -  ch1, 2sc in each st, join sl st. (12)
  • R2 - ch1, *[sc, 2sc in next st], *repeat 6 times, join sl st (18)
  • R3 - ch1, *[sc2, 2sc in next st], *repeat 6 times, join sl st (24)
  • R4 - ch1, *[sc3, 2sc in next st], *repeat 6 times, join sl st (30)
  • R5-R9 - ch1, sc in each st, join sl st (30)
  • R10 - ch1, *[sc3, sc2tog], *repeat 6 times, join sl st (24)
  • R11 - ch1, In F.L.O. sc, *[3dc next st, then 2sc next st], *repeat to end, join sl st. Leave a long tail.
Ice-cream Cone
  •     Magic ring, 6sc into ring
  • R1 -  ch1, 2sc in each st, join sl st. (12)
  • R2 - ch1, *[sc, 2sc in next st], *repeat 6 times, join sl st (18)
  • R3 - ch1, in B.L.O. hdc in each st, join sl st (18)
  • R4 - ch1, sc, *[hdcfp, work B.L.O sc1], *repeat to end, join sl st (18)
  • R5-R8 same as R4
  • R9 - ch1, work F.L.O. *[2dc in next st, dc3], * repeat to end, join sl st (24)
  • R10 - ch1, work B.L.O. sc to end, join sl st (24)
  • R11&12 - sc to end, join slip st (24) on R12 fasten off after sl st leaving a long tail.
Finishing
  • Place 6mm safety eyes on scoop between R6 & R7 and approx 4 st apart.
  • Using contrasting thread, create a mouth 1 row down from eyes.
  • At top of Scoop, using the long tail from magic ring sew on the key-chain (I usually sew 8 or 9 loops around the chain ring to ensure it is firmly held in place)

  • Stuff the 2 halves with toy-safe stuffing (I am personally very strict on this one, stuffing must meet UK standards)Yes it's only a key-chain but why not play it safe
  • Using the back loops on the cone and the back loops in the scoop, stitch the 2 pieces together.
  • Weave in the ends.
  • ENJOY or GIFT but post a photo on your blog and leave a link in the comments below.
F.L.O. = front loop only
B.L.O = back loop only
hdcfp = half-double crochet in front post
sc = single crochet
dc = double crochet
hdc = half-double crochet
dc = double crochet


Faux-box card - Apology

I haven't quite finished writing up the Faux-box card instructions just yet, but hopefully they will be ready for tomorrow

Hugs & Happy Thoughts
Buffy xx


Sunday, 13 February 2011

A new challenge and a bit of revenge

My sister in law hates cute and girly, so to kill two birds with one stone, I've created this card for the Truely Scrumptious challenge #50 and her birthday next week..... : )

This was this times challenge sketch


I only hope this effort is worthy of the Truly Scrumptious challenge sketch.
                                                                                          TSC50

I've used three lovely girly colours for the background, a peel-off I coloured pink using a sharpie pen, the reflective image was created using a rectangular make-up sponge. I topped it off with a multi-coloured paper flower and butterfly pee-off.

  • Papers - pink pearlescent, blue nancy watt design freebie and yellow freebie
  • Free dog & dragonfly stamp
  • Promarkers - (main image) Tan, Cool grey 2, Mint green, Tulip yellow, Orchid and Powder blue.
  •                       (reflection)  Satin, Cool grey 1, Pastel green, Buttercup, Bluebell & Pastel blue
  • Tim Holtz distress inks - Stormy sky & Brushed corduroy
  • Fizzy Moon - Clelebrations paper blossoms
  • Peel-off - I think they are Anita's peel-offs, but I can't remember
 See you soon
 Buffy x
Related Posts Plugin for WordPress, Blogger...